Important
CDPDM is now PDMDeploy. Starting with PDMDeploy V31, the add-in features a redesigned dark interface and activation codes. Older screenshots and video tutorials referencing CDPDM show the previous interface.
Updating Blue Byte Systems PDM add-ins with PDMDeploy
Note
This video was recorded with an older version of PDMDeploy (CDPDM) and shows the previous interface. The workflow is the same. Refer to the screenshots below for the current interface (V31 and later).
This article is about updating any SOLIDWORKS PDM add-in you purchase from Blue Byte Systems Inc using the PDMDeploy add-in. This tool streamlines the code delivery process for SOLIDWORKS PDM customers by utilizing the PDMDeploy continuous delivery platform. It allows you to access and update your purchased add-ins and all their versions efficiently.
Installation Steps:
Download PDMDeploy
Public activation code
E2A50448-9F15-42D9-B2F3-290409E81F94
For our standard products, use the public activation code above. If we developed a custom solution for you, use the private activation code from your welcome email instead. To install PDMDeploy after downloading it, please follow the instructions in this article.
Unblock the downloaded file: Right-click on
PDMDeploy.cexand select Properties. In the properties dialog, check the Unblock option and click OK.Open the administration tool: Log into your vault with a PDM user that has the Edit Add-Ins permission.
Import the add-in:
Go to File > Open and browse to
PDMDeploy.cex.Click OK to open the CEX file.
Drag and drop the PDMDeploy add-in icon onto the add-ins node in the administration tool. This will add the add-in into the add-ins node.
Load your configuration:
- Right-click on the PDMDeploy add-in and click Load Customer Configuration (Activation Code or File)...
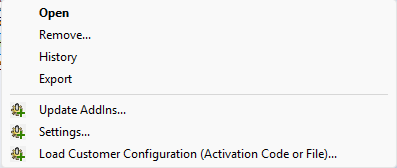
- Enter the activation code from your welcome email and click Activate.
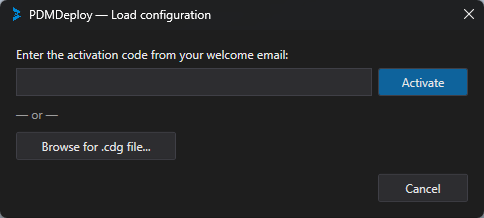
Alternatively, click Browse for .cdg file... if you received a Customer Configuration File instead. If the file was downloaded from the internet, unblock it first (right-click the file, Properties, check Unblock, OK).
You will be prompted with a message that reads "Configuration loaded successfully!"
Right-click on PDMDeploy in the add-ins node and click Update AddIns...
Check the add-in you want to install from the list, select the version you need from the Server version dropdown (the newest is preselected), and click Install selected.
Confirm subsequent dialog boxes to restart PDM and the administration tool.
Updating an Add-in:
- Right-click on the PDMDeploy add-in (under Add-ins in the Administration tool) and click Update AddIns...:
- The PDMDeploy window opens immediately, with no waiting dialog. The status bar at the bottom first reads your installed add-ins from the vault, then loads the available add-ins from the server:

The Status column shows where you stand for each add-in: Not installed, Update available, or Up to date. The Server version dropdown preselects the newest version. Pick an older one only if instructed by support.
Check the add-in(s) to update (the header checkbox selects all) and click Install selected. The status bar shows which add-in is being downloaded and installed. The process might take a few moments.
You will be prompted at the end to restart your PDM session. This allows your local client to get the new version of the installed add-in. This is optional but highly recommended for tasks that are triggered from File Explorer.
Tip
If PDMDeploy has not been configured yet, the window shows an activation panel instead of the add-in list. Enter your activation code or browse to your .cdg file right there.
Warnings
Warning
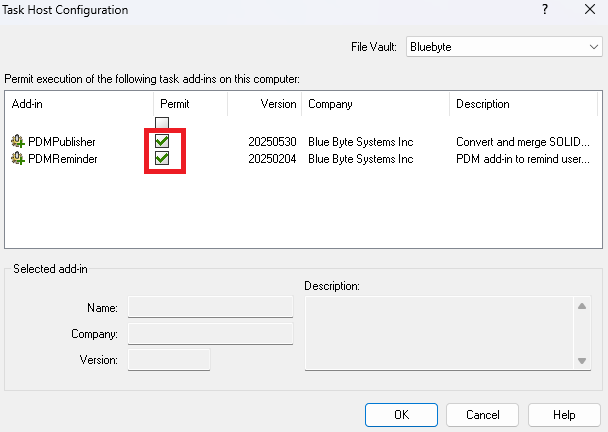
PDMDeploy does not permit new task add-ins in the Task Host Configuration. You must do that manually:
Warning
All client computers using the add-in's tasks must be restarted to use the new version.